Congratulations on completing Lesson 1! We will continue our learning with Mickey Mouse's appointment.
Here is what you'll be learning in Lesson 2:
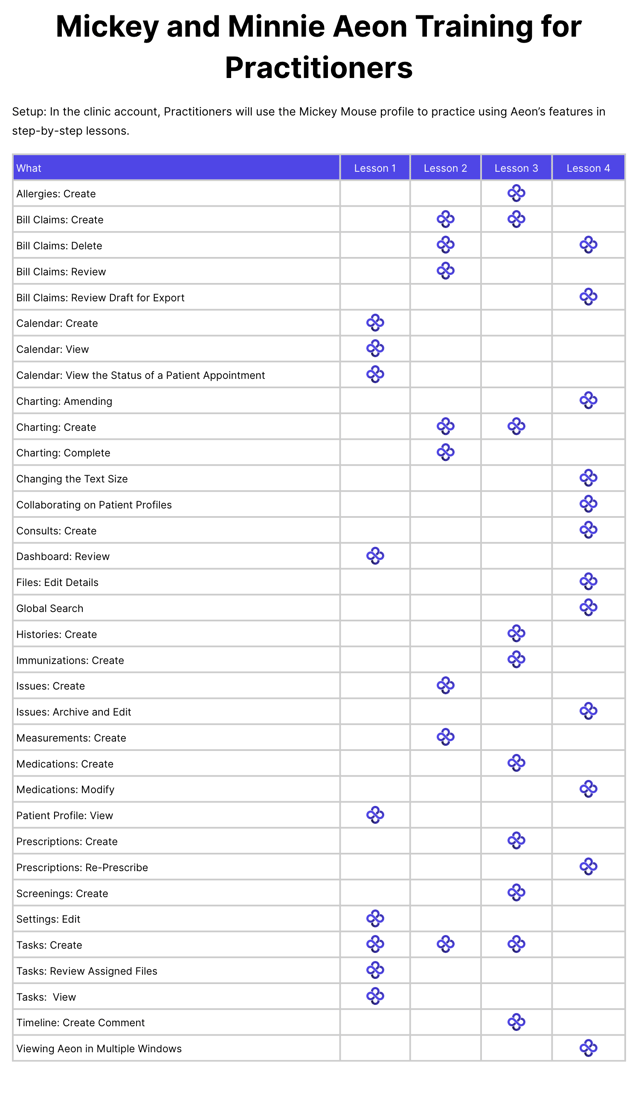
In This Article
Training Setup
🔹Create a Chart Note and a Measurement
🔹Create an Issue
🔹Create Tasks for Staff
🔹Complete Chart Notes
🔹Create Billing Claim
🔹Locate Draft Billing Claims
🔹Delete the Billing Claim
Training Setup
1. To complete this training, we suggest you set up your screen with two windows (or two monitors) to view both the lesson and the demo account side by side. It will look like this:

2. This training will take you through practice situations that will help you become familiar with how Aeon will help your practice stay organized and save you time.
Create a Chart Note and a Measurement
We left off in our last lesson where Mickey Mouse was about to walk in for his appointment.
1. Open Mickey Mouse's Patient Profile
The Enhanced Charting System makes it super easy to document patient medical data, manage Tasks, and includes handy features like referrals, lab requests, and Prescriptions, all while keeping everything compliant with legal and usability standards.
2. Go to Charting
3. Click New Chart Note:
4. Give your Note a title (you can't save it otherwise)
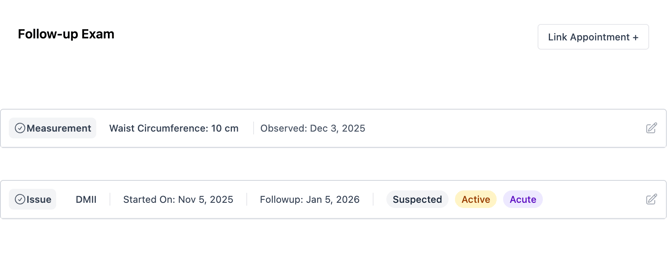
Now, you will have a conversation with Mickey about his health. You decide to take Mickey's measurements.
Measurements are a handy way to keep track of all sorts of patient details, like vital signs and clinical metrics. Plus, you can easily look back at past trends to help make the best decisions!
We are going to add the Measurements to the Chart Notes via embeds.
5. In the chart note, start to type /measurement and then choose it from the dropdown:

You will see an embedded pop-up with values for you to fill in.
6. Under Type, choose "Waist Circumference" - you'll note that the unit field automatically populates with the appropriate type of measurement (in this case, you can pick from cm or in)
7. Enter Mickey's waist circumference in the Value field
As you type, note the indicator in the bottom right of the embed field that shows you the information has been saved. Note that it is saved in this draft note, but the Measurement is not active until you save and sign the Chart Note. Let's try this out.
8. Do not click Sign and Save at the bottom of the Chart Note. Instead, click on the "Measurements" tab in the Patient Profile:
![]()
You'll note that the Measurement you just created in the chart note is not listed here. That's because the draft of it is saved, but it won't appear until after the Chart Note is Signed and Saved. Now, let's go back to our draft Chart Note.
9. Click Charting
10. Click the title of the Draft Note
Now your draft Chart Note with the Measurement embed will open.
As you continue your appointment with Mickey, you suspect he may have Type 2 Diabetes. We will use an Issue to capture this information within the Chart Note.
Create an Issue
The Issues Management System helps healthcare providers easily keep track of, update, and manage patient medical issues, whether they're new, ongoing, or resolved.
1. On a new line in the Chart Note, start to type in /issue and then choose it from the dropdown
2. Add Type 2 Diabetes to the Issue Type field
3. Leave the Diagnosis Status as Suspected
4. For the field Started On, choose a date when the symptoms started
🎓 Training Tip: Calendar Selector
You can easily pick a date by selecting the Calendar icon and navigating to the correct year/month/day instead of entering it manually.
5. For the Followup Due date, change it to one month from today
⚠️ Note: When you choose a Followup Due date, there is no automatic calendar event or Task that is created as a result. It's simply a date so that if you are looking at the patient record, you know when you thought you'd like to review this again.
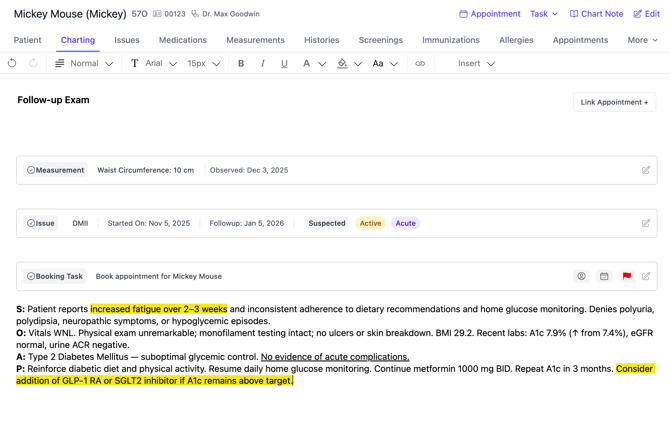
6. In your Chart Note, your screen is becoming full. Click the - icon at the top right of each of the embeds for Measurement and Issue to collapse the boxes
Here is what your Chart Note will look like now:
Based on today's appointment, we'll want Mickey to return for a follow-up.
Create Tasks for Staff
There are two types of Tasks you can create for others. It's important to choose the correct one as Aeon handles them differently:
- General Task: This is for any type of to-do that does not involve booking an appointment.
- Book Appointment Task: This is specifically for booking calendar appointments.
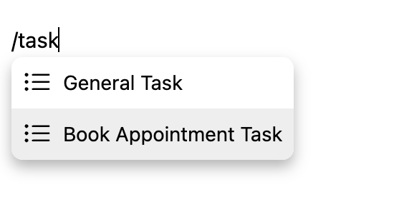
1. In the Chart Note, start to type in /task
2. Choose Book Appointment Task
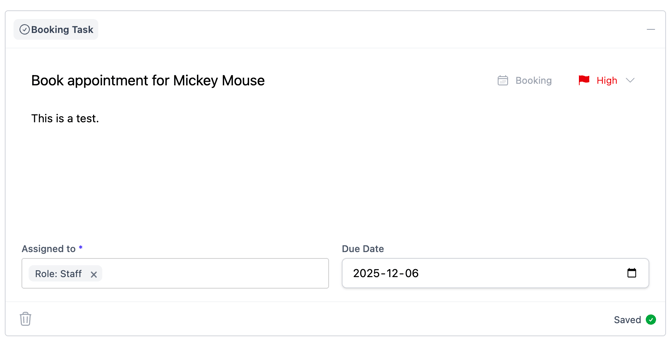
You will see a Task embed open up with the title filled in for you (can be edited).
3. In the description area, add This is a test.
4. Change the priority to High by clicking the flag at the top right
5. In the Assigned To field, type in Staff and choose it from the list
6. Set a due date for 2 days from now
This is what it will look like:
🚀 Best Practice: Assigning Tasks to "Staff"
Instead of assigning a Task to a specific individual, you have the ability to choose a role "Staff". When you assign a Task to the role of "Staff", then all Aeon users with this permission level will see the Task as something to complete. We suggest your clinic adopt the workflow that the person who takes it on should re-assign the Task to themselves, and that way it will be removed from the active Task list of all other Staff members.
Remember, this Task won't be live until you Sign & Save the Chart Note, which we will do shortly.
Before we save the note, let's look at what was created for us in Tasks.
7. Go to Tasks in the left column
You will see the system created a Task for you when you left Mickey's Chart Note. Aeon wants to ensure that you finish your note!
8. We could open the note, but from this main Task page, click the icon on the far right that looks like an open book. When you hover your mouse over it, you'll see a pop-up that reads "Complete Chart Note"
9. Click the Complete Chart Note icon to be redirected back to your draft note
Complete Chart Notes
Now it's time to complete your chart notes for Mickey's visit.
1. Enter your notes from the appointment (I've created some SOAP notes) and try out the formatting options found at the top of the Chart Note:
2. At the bottom of the note, click Sign and Save
- Now, when you look at the list of Chart Notes for Mickey, you'll see this note is Signed
- When you go to the Measurement tab in Mickey's patient profile, you'll see the entry you made - same with Issues
- When you look at the right-hand sidebar and choose Measurement, you'll see the entry you made - same with Issues
Let's have a look at the task you assigned.
3. Click Tasks in the left column
4. Click All Open Tasks
5. Click Filter
6. Choose Booking (type)
Now you can see the Task you created.
7. Click the star icon to the right of the Task name to follow it
8. Go to the area for Starred Tasks
See the Task there.
Let's see what the staff member sees and the benefit of using the correct Task type.
The staff member will click the Booking icon:

The staff member will be redirected to the Calendar and the very next available appointment with that practitioner. Additionally, all of the most important information is filled in for them:
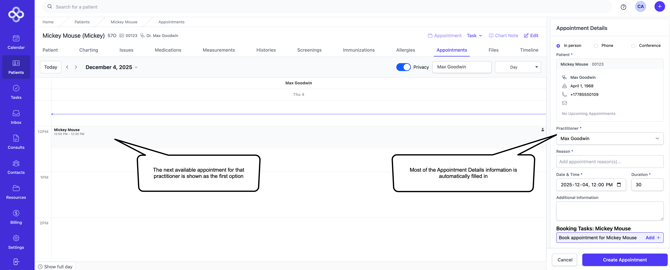
All the staff member needs to do is confirm the date and time and save the appointment. This saves your staff lots of time!
This is why it's important to choose the correct Task type.
Create Billing Claim
During the appointment—or immediately afterward—you’ll want to create a billing entry for your time. In Aeon’s Early Access Billing, you can create billing claims in Aeon and then export them as a file for upload into ClinicAid to submit to the province.
We are going to practice with a Fee-for-Service bill claim. If you'd like to see the information on LFP bill claims, click here.
There are three ways to create a Bill entry:
-
#1: From a Draft Chart Note
-
#2: From a Completed Chart Note
-
#3: From a Calendar Appointment
You can see all three methods in this article. For our situation, we will use #2: From a Completed Chart Note
1. Go to Charting in Mickey's Patient Profile
2. Click the title of the saved Chart Note
3. Click Create New Revision
4. At the bottom of the page, click Bill
5. Here you can see some information is pre-populated for you - the patient's name, your name, and the date of service:

6. In the Billing Code field, start to type in Complete Examination in Office (Age 70-79) and choose it from the dropdown (or whatever code you want to use for this training)
7. We will leave the Units as 1, but this can be changed
8. The Fee automatically populates, based on the Billing Code and Units - so you don't need to do any math!
9. In the Diagnostic Codes field, start to type in Diabetes Mellitus and choose code 250 from the list (or whatever code you want to use for this training)
10. As some Billing Claims require start and end times, let's practice that. Enter the start time of the examination and the end time. Use the clock icon to quickly pick the time components and a.m. or p.m.:

11. In the Status field, leave the option as DRAFT, as we will delete this billing entry. If the claim is ready for your staff to export to the Billing Management Program, then you'd change the status to Ready for Export
12. Click on the Advanced tab of the Billing Claim:

This information is pulled in from the Clinic Settings and your own Practitioner Settings, though information can be altered here on an ad hoc basis.
🎓 Training Tip: For full information on setting up your Billing defaults, click here.
13. Click Save (this only saves the Billing Claim - not the entire Chart Note)
Locate Draft Billing Claims
1.Click Billing in the left column
2. See the Draft Billing Claim you made:

This is where you will find all of your Billing Claims across all of your patients.
Delete the Billing Claim
As this is a training exercise, you may not want to have a billing entry for a fake patient. To delete the claim, follow these steps:
1. Open Mickey Mouse's Patient Profile
2. Click Charting
3. Click on the title of the Chart Note you made to open it
4. Click Create New Revision
5. Click Bill at the bottom of the page
Here you will see the Billing Claim you previously created.
6. To the left of the billing entry you will see a ➖ icon. Click on that
7. The claim will be removed
8. Click Save to confirm billing entry removal
9. Click Amend and Save to update the Chart Note
If you navigate back to the Billing area (by clicking Billing in the left column), you will see that the Billing Claim is removed.
Now that we've completed the Chart Notes for Mickey, we can mark the Task "Complete Chart Note for Mickey Mouse" as closed. Oh wait! Aeon did that too. If you go to your Tasks area, you'll see the Task was marked closed.
Fantastic 🎉! You've learned about many of Aeon's essential features through this lesson and have a great base understanding. In Lesson 3, you'll continue your work on Chart Note embeds. See you then!