Environment
- Practitioner Role
About
The Enhanced Charting System makes it super easy to document patient medical data, and manage tasks, and includes handy features like referrals, lab requests, and prescriptions, all while keeping everything compliant with legal and usability standards. It's designed for practitioners, staff, and other healthcare professionals to smoothly document patient visits, handle tasks, and look up past data. You can use it during patient appointments, chart reviews, and for administrative tasks.
Instructions
Training Tip 🎓: Overview of Chart Notes
For a complete overview of Chart Notes, check out the Overview article.
🔐 Only Practitioners can create Chart Notes.
1. Click Patients in the left-hand column
2. Find the patient and click on their name
3. Click Charting
4. Give the Chart Note a title (mandatory)
5. Enter your notes in the note area. Feel free to use the formatting options located above the note area.
As you enter a Chart Note, you can embed Tasks, Consults, Screenings, Immunizations, Measurements, Medications, Issues, Prescriptions, Histories and more right within the Chart Note so that you don't have to leave the page. To do so:
6. As you are typing, enter the command /task (for example), and you'll see the options that appear:
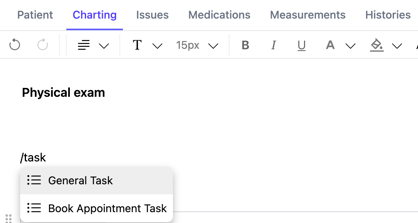
7. After you choose the type of Task, you'll see a blank embed form appear:
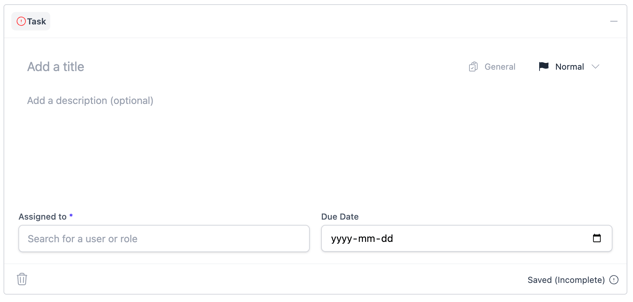
8. Fill in the information
9. When you are done with the Chart Note, click Sign and Save. This will save the Chart Note, and any embeds you've created will now be found in their respective tabs, linked to this Chart Note.
Training Tip 🎓: Any item you create within a Chart Note (i.e., Task, Screening, etc.) will be saved within the Note but will not be finalized in the Patient Profile until you Sign & Save the Chart Note.
Best Practice 🚀: If you leave a Chart Note before you've Signed & Saved it, it will be saved as a Draft. The system will create a Task for you to complete the Chart Note to ensure this isn't missed. Once you Sign & Save the Chart Note, the Task will close.
Additional Information
Here is a list of things you can create using embeds after typing " / "
